# DeadPool
**Repository Path**: ryuchen/DeadPool
## Basic Information
- **Project Name**: DeadPool
- **Description**: 该项目是一个使用celery作为主体框架的爬虫应用,能够灵活的添加爬虫任务,并且同时运行多站点的爬虫工作,所有组件都能够原生支持规模并发和分布式,加上celery原生的分布式调用,实现大规模并发。
- **Primary Language**: Python
- **License**: Not specified
- **Default Branch**: master
- **Homepage**: None
- **GVP Project**: No
## Statistics
- **Stars**: 0
- **Forks**: 0
- **Created**: 2020-04-10
- **Last Updated**: 2020-12-19
## Categories & Tags
**Categories**: Uncategorized
**Tags**: None
## README
Welcome to DeadPool


该项目是一个使用celery作为主体框架的爬虫应用(希望后期能够写成大型的爬虫项目框架),灵感源自目前在学校进行的知识图谱的科研项目,主要用于该项目的网上文本数据采集工作。
### 🏠 个人小栈
[我的个人博客地址: https://ryuchen.club/](https://ryuchen.github.io/)
> 如果你觉得这个项目不错,想要深入了解,可以关注上面的个人小栈,未来更新的说明会刊登在这里,并且会不定时分享部分内容和心得
### 📎 项目说明:
* 因为之前工作期间深入使用过 celery 作为 django web 的后台异步任务调度,但是深感 celery 的强大,并不应该局限在 django 异步任务中附带使用。
* 于是想深入拓展一下该框架的使用,便想以celery作为主框架构建一个项目,但是后续在网上没有搜索到关于 celery 的单独项目作为参考( 可能是我搜的姿势不对,毕竟身高不够,视线太低 =.= )。
* 既然没能找到一个很好的介绍和使用 celery 的开源 demo ,那就自己来吧,毕竟身为程序员,最大的技能就是动手造重复的轮子,并且沉迷其中不可自拔。
* 目前研究生阶段在搞实验室中的知识图谱构建的相关工程,那么知识的来源是最重要的,索性就以此出发根据该项目构建一个能够爬取不同站点的高并发爬虫框架。
鉴于上述原因,我构建了这个项目,希望能够帮助自己深入理解和熟练使用 celery 的强大功能。
### 🔥 设计说明:
#### 任务模块
apps中注册的任务,可以通过 [jobs.yaml](http://example.com/ "Develop Asynch Jobs") 配置文件的 include 机制,动态支持任务加载和取消
具体可以参考如下:
```yaml
# Base Tasks Router Settings
# Task name
jobs:
#
# Proxy Pool Settings
task_proxy: !include jobs.d/periodic.d/task_proxy.yaml
#
# Cookie Pool Settings
# task_cookie: !include jobs.d/periodic.d/task_cookie.yaml
#
# Tmall Crawler Settings
# task_tmall: !include jobs.d/async.d/task_tmall.yaml
#
# Eastmoney Crawler Settings
task_eastmoney: !include jobs.d/async.d/task_eastmoney.yaml
```
爬虫任务(点击展开)
```
/
├── apps/ # 任务目录
├── asynch/ # 异步任务目录(也是该框架运行各种爬虫脚本的主目录)
├── tasks/
├── task_tmall/ # example for Tmall 商品爬取目录(其他爬取任务跟该目录框架一致)
├── sqlite.sql # 为了之后中断续爬做准备
├── __init__.py # 该任务的主程序入口
├── __main__.py # 该任务的主程序入口
├── crawler.py # 单一爬取程序
├── middleware.py # 爬取后的页面处理程序
└── pipline.py # 处理后的信息存储程序
└── __init__.py
├── __init__.py
└── base.py # 异步任务的基类,继承了该基类才能被框架正确导入
```
> 构建在 apps.asynch.tasks 目录下面,拥有完备的抽象实现逻辑,并且以配置文件的形式进行任务功能的声明,具体内容请参见: *如何构建该项目的[爬虫任务](http://example.com/ "Develop Asynch Jobs").*
* 该套代码拥有两个样例程序(task_tmall)和(task_eastmoney)
* task_eastmoney: 是爬取[东方财富网](http://eastmoney.com)的关于指定关键词的财经和期货新闻
* task_tmall: 是爬取[天猫](https://tmalll.com)的商家详情页面中的买家评价信息
* 每个任务包含四个主要部分
* __main__.py 主爬虫的入口程序,根据配置文件构建代码执行逻辑
* crawler.py 单个主体的爬虫程序利用 requests 请求页面进行预处理
* middleware.py 接收 crawler.py 的输出结果,进行数据清洗和提取
* pipeline.py 将清洗后的结果按照配置文件存储到指定地方
* 能够实现爬取过程的断点续爬功能(TODO)
* sqlite.sql 数据脚本文件创建 sqlite3 小数据库作为爬取记录
配置文件(样例)
```yaml
# 需要进行引入的类的名称
class: "TaskEastmoney"
# 任务所在的类别
module: "asynch"
# 配置
options:
# 登录配置声明
login:
enable: false
nickname: 'nickname'
username: 'username'
password: 'password'
# proxy 配置声明
proxy: true
# cookie 配置声明
cookie: true
# 启用的存储模块声明
storage:
module: "MongoStorage"
collection: ""
# 爬取时的关键字
keyword:
- "大豆"
```
---
周期任务
```
/
├── apps/ # 任务目录
│── periodic/ # 定时任务目录(该框架的通用脚本目录)
├── tasks/
├── task_cookie/ # 周期检查请求的 cookie 是否可用 (TODO)
├── __init__.py
└── __main__.py
├── task_proxy/ # 周期性更新代理池中的IP地址
├── __init__.py
└── __main__.py
└── __init__.py
├── __init__.py
└── base.py # 定时任务的基类,继承了该基类才能被框架正确导入
```
> 构建在 apps.periodic.tasks 目录下面,利用celery的周期特性,完成周期性任务的执行,具体内容请参见: *如何构建该项目的[周期任务](http://example.com/ "Develop Periodic Jobs").*
* 该套代码拥有两个样例程序(task_cookie)(TODO) 和(task_proxy)
* task_proxy: 构建代理池,周期性检查代理池中任务的状态,维护最低标准的可用IP
* task_cookie: 构建cookie池,周期性检查当前cookie是否可用,维护最低标准的可用cookie
配置文件(样例)
```yaml
# 需要进行引入的类的名称
class: "TaskProxy"
# 任务所在的类别
module: "periodic"
# 配置
options:
# set 0 proxy address will not force expire
# Or will force expire current proxy pool in current expire setting (s)
expire: 600
pool:
maximum: 60
minimum: 10
concurrent: 5
# the job schedule time (min)
crontab: "*"
```
---
插件模块
```
/
├── common/ # 通用库
├── plugins/ # 通用解析插件库
├── human/ # 模拟真人操作的库
├── slider.py # 模拟真人浏览页面操作
├── verification.py # 反爬验证程序操作
└── __init__.py
├── storage/ # 爬取结果存储的库
├── filestorage.py # 文件形式本地存储
├── mongostorage.py # mongodb存储
└── __init__.py
└── __init__.py
```
> 构建在 common.plugins 集成了常见的反爬机制识别、人为操作模拟和存储系统支持
* 在 human 库下实现了:
* 模拟人为浏览页面进行滑动的操作(slider.py)
* 常规滑块识别人机识别的程序操作(verification.py) (TODO)
* 在 storage 库下实现了:
* 爬取内容的本地磁盘文本形式存储的功能支持(filestorage.py)
* 爬取内容的mongodb文本形式存储的功能支持(mongostorage.py)
---
其他模块
> 为了尽可能的拓展支持的平台和项目的灵活性,而加入的功能
* 根据运行平台自动加载相对应的chromediver文件
* 通过配置文件的 include 机制,动态支持任务加载和取消
* 通过 elasticsearch 记录任务运行中的完整过程(TODO)
### 👌 代码说明:
```
/
├── apps/ # 任务目录
├── asynch/ # 异步任务目录(也是该框架运行各种爬虫脚本的主目录)
├── tasks/
├── task_tmall/ # example for Tmall 商品爬取目录(其他爬取任务跟该目录框架一致)
├── sqlite.sql # 为了之后中断续爬做准备
├── __init__.py # 该任务的主程序入口
├── __main__.py # 该任务的主程序入口
├── crawler.py # 单一爬取程序
├── middleware.py # 爬取后的页面处理程序
└── pipline.py # 处理后的信息存储程序
└── __init__.py
├── __init__.py
└── base.py # 异步任务的基类,继承了该基类才能被框架正确导入
│── periodic/ # 定时任务目录(该框架的通用脚本目录)
├── tasks/
├── task_cookie/ # 周期检查请求的 cookie 是否可用 (TODO)
├── __init__.py
└── __main__.py
├── task_proxy/ # 周期性更新代理池中的IP地址
├── __init__.py
└── __main__.py
└── __init__.py
├── __init__.py
└── base.py # 定时任务的基类,继承了该基类才能被框架正确导入
├── bin/
└── chromedriver.exe # browser driver 驱动程序
├── common/ # 通用库
├── plugins/ # 通用解析插件库
├── human/ # 模拟真人操作的库
├── slider.py # 模拟真人浏览页面操作
├── verification.py # 反爬验证程序操作
└── __init__.py
├── storage/ # 爬取结果存储的库
├── filestorage.py # 文件形式本地存储
├── mongostorage.py # mongodb存储
└── __init__.py
└── __init__.py
├── settings.py # 配置
├── singleton.py # 单例模式
├── sqlitedao.py # sqlite3操作封装,用于爬取过程中的记录
├── timetrans.py # 时间格式转换
├── exceptions.py # 异常类封装
└── __init__.py
├── config/ # 配置目录
└── jobs.d/ # 任务配置目录
├── async.d/
└── task_tmall.yaml
├── periodic.d/
├── task_cookie.yaml
└── task_proxy.yaml
├── config.yaml # 通用配置
└── jobs.yaml # 任务加载配置(将 jobs.d 中的配置文件 include 进来后开启任务)
├── contrib/ # celery 核心库
├── elastic/ # elasticsearch(用于执行任务日志记录)
├── indices/ # elasticsearch index mapping
├── rlogs.py # 运行日志的 index mapping
└── __init__.py
├── base.py # elasticsearch 实例创建类
└── __init__.py
├── mysql/ # mysql(用来暂存 IP proxy)
├── tables/ # mysql table mapping
├── proxy.py # IP proxy table mapping
└── __init__.py
├── base.py
└── __init__.py
├── redis/ # redis(celery 运行时的broker和backend)
├── base.py # redis 实例创建类
└── __init__.py
└── __init__.py
├── deadpool/ # celery application 主目录
├── celery.py # 程序主入口
└── __init__.py
├── driver/ # broswer 驱动存放目录
├── chromedriver_linux64.zip
├── chromedriver_mac64.zip
└── chromedriver_win32.zip
├── logs # 运行日志
├── result # filestorage 插件的默认结果存放目录(可以通过配置文件修改)
├── test # 开发时候的测试脚本
└── utils/ # 工具库
├── driver.py # 依据平台加载 browser 驱动
├── loader.py # yaml文件的第三方Loader
├── network.py # 主机网络信息脚本
└── __init__.py
```
### 📖 使用说明:
#### 环境搭建
该项目最终将适配 全平台运行(macOS,Windows,Linux),但是目前尚处于beta版本的开发,以下说明均为在 Windows 下的开发说明
开发环境
* Windows 10 (Version 2004) WSL2 Ubuntu-18.04
* 运行环境依赖 redis/mysql/mongodb/elasticsearch
* 选装 kibana
#### 依赖安装
首先是 celery 运行需要依赖 redis 作为 broker 和 backend
```shell script
*WSL2 Ubuntu Bash*
sudo apt update && apt upgrade
sudo apt install redis-server
```
然后是用于存储代理地址的 mysql
```shell script
*WSL2 Ubuntu Bash*
# clean the default mysql && mariadb
sudo apt remove --purge *mysql*
sudo rm -rf /etc/mysql /var/lib/mysql
sudo apt remove --purge *mariadb*
sudo apt autoremove
sudo apt autoclean
wget –c https://dev.mysql.com/get/mysql-apt-config_0.8.15-1_all.deb
sudo dpkg -i mysql-apt-config_0.8.15-1_all.deb # select 8.0
sudo apt update
sudo apt policy mysql-server #(it will show 8.0 is the default candidate)
sudo apt install mysql-server
```
之后是用于存储爬取的文本内容的 mongodb
```shell script
*WSL2 Ubuntu Bash*
wget -qO - https://www.mongodb.org/static/pgp/server-4.2.asc | sudo apt-key add -
echo "deb [ arch=amd64,arm64 ] https://repo.mongodb.org/apt/ubuntu bionic/mongodb-org/4.2 multiverse" | sudo tee /etc/apt/sources.list.d/mongodb-org-4.2.list
sudo apt update
sudo apt install -y mongodb-org
```
最后是用来保存运行日志使用的 elasticsearch && kibana (选装)
```shell script
*WSL2 Ubuntu Bash*
wget -qO - https://artifacts.elastic.co/GPG-KEY-elasticsearch | sudo apt-key add -
sudo apt-get install apt-transport-https
echo "deb https://artifacts.elastic.co/packages/oss-7.x/apt stable main" | sudo tee -a /etc/apt/sources.list.d/elastic-7.x.list
sudo apt update
sudo apt install -y elasticsearch-oss kibana-oss
```
完成上述依赖安装之后请自行修改和记住相应配置,修改其配置文件到 127.0.0.1:xxxx 对应端口上
然后利用如下工具在 WSL2 下启动 systemctl 功能进行上述软件的开启
[genie](https://github.com/arkane-systems/genie) A quick way into a systemd "bottle" for WSL
```shell script
*WSL2 Ubuntu Bash*
sudo apt install systemd-genie
echo -e "alias systemctl='genie -c systemctl'" > ~/.bash_aliase
```
如果上述有什么不对的地方,请在issue提出
#### 安装说明
然后在 Windows 上安装 [Visual Studio Community](https://visualstudio.microsoft.com/zh-hans/vs/community/) && [Python 3.7.6](https://www.python.org/downloads/)
记得 VS Community 勾选 Build Tools && Python 勾选 for all user
然后进入你 clone 本代码的目录
```shell script
*Windows Powershell*
# Run as Administrator
pip install -U pip
pip install virtualenv
virtualenv venv
.\venv\Scripts\activate
# 安装环境依赖
pip install -r requirements.txt
```
---
#### 运行说明
启动项目
```shell script
*Windows Powershell*
celery -A deadpool worker -l info -P eventlet -E
```

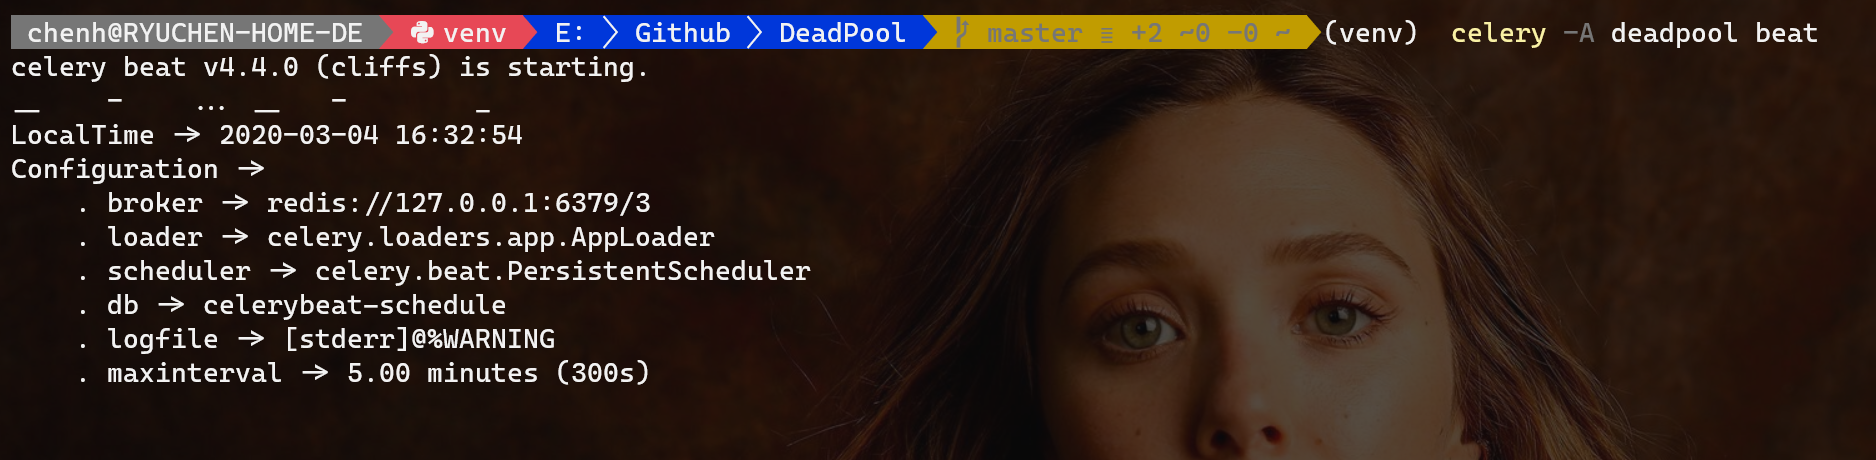
Beat worker
```shell script
*Windows Powershell*
celery -A deadpool beat
```
调用任务
```shell script
*Windows Powershell*
celery -A deadpool shell
# 在出现的Python编辑窗口中输入如下命令调用任务
Python 3.7.6 (tags/v3.7.6:43364a7ae0, Dec 19 2019, 00:42:30) [MSC v.1916 64 bit (AMD64)] on win32
Type "help", "copyright", "credits" or "license" for more information.
(InteractiveConsole)
>>> from celery.execute import send_task
>>> send_task('task_eastmoney')
```

监控任务
```shell script
celery -A deadpool flower
```
同时可以在 浏览器中检测任务运行状态
https://localhost:5555
---
#### 结果样例
爬取页面内容

页面内容提取
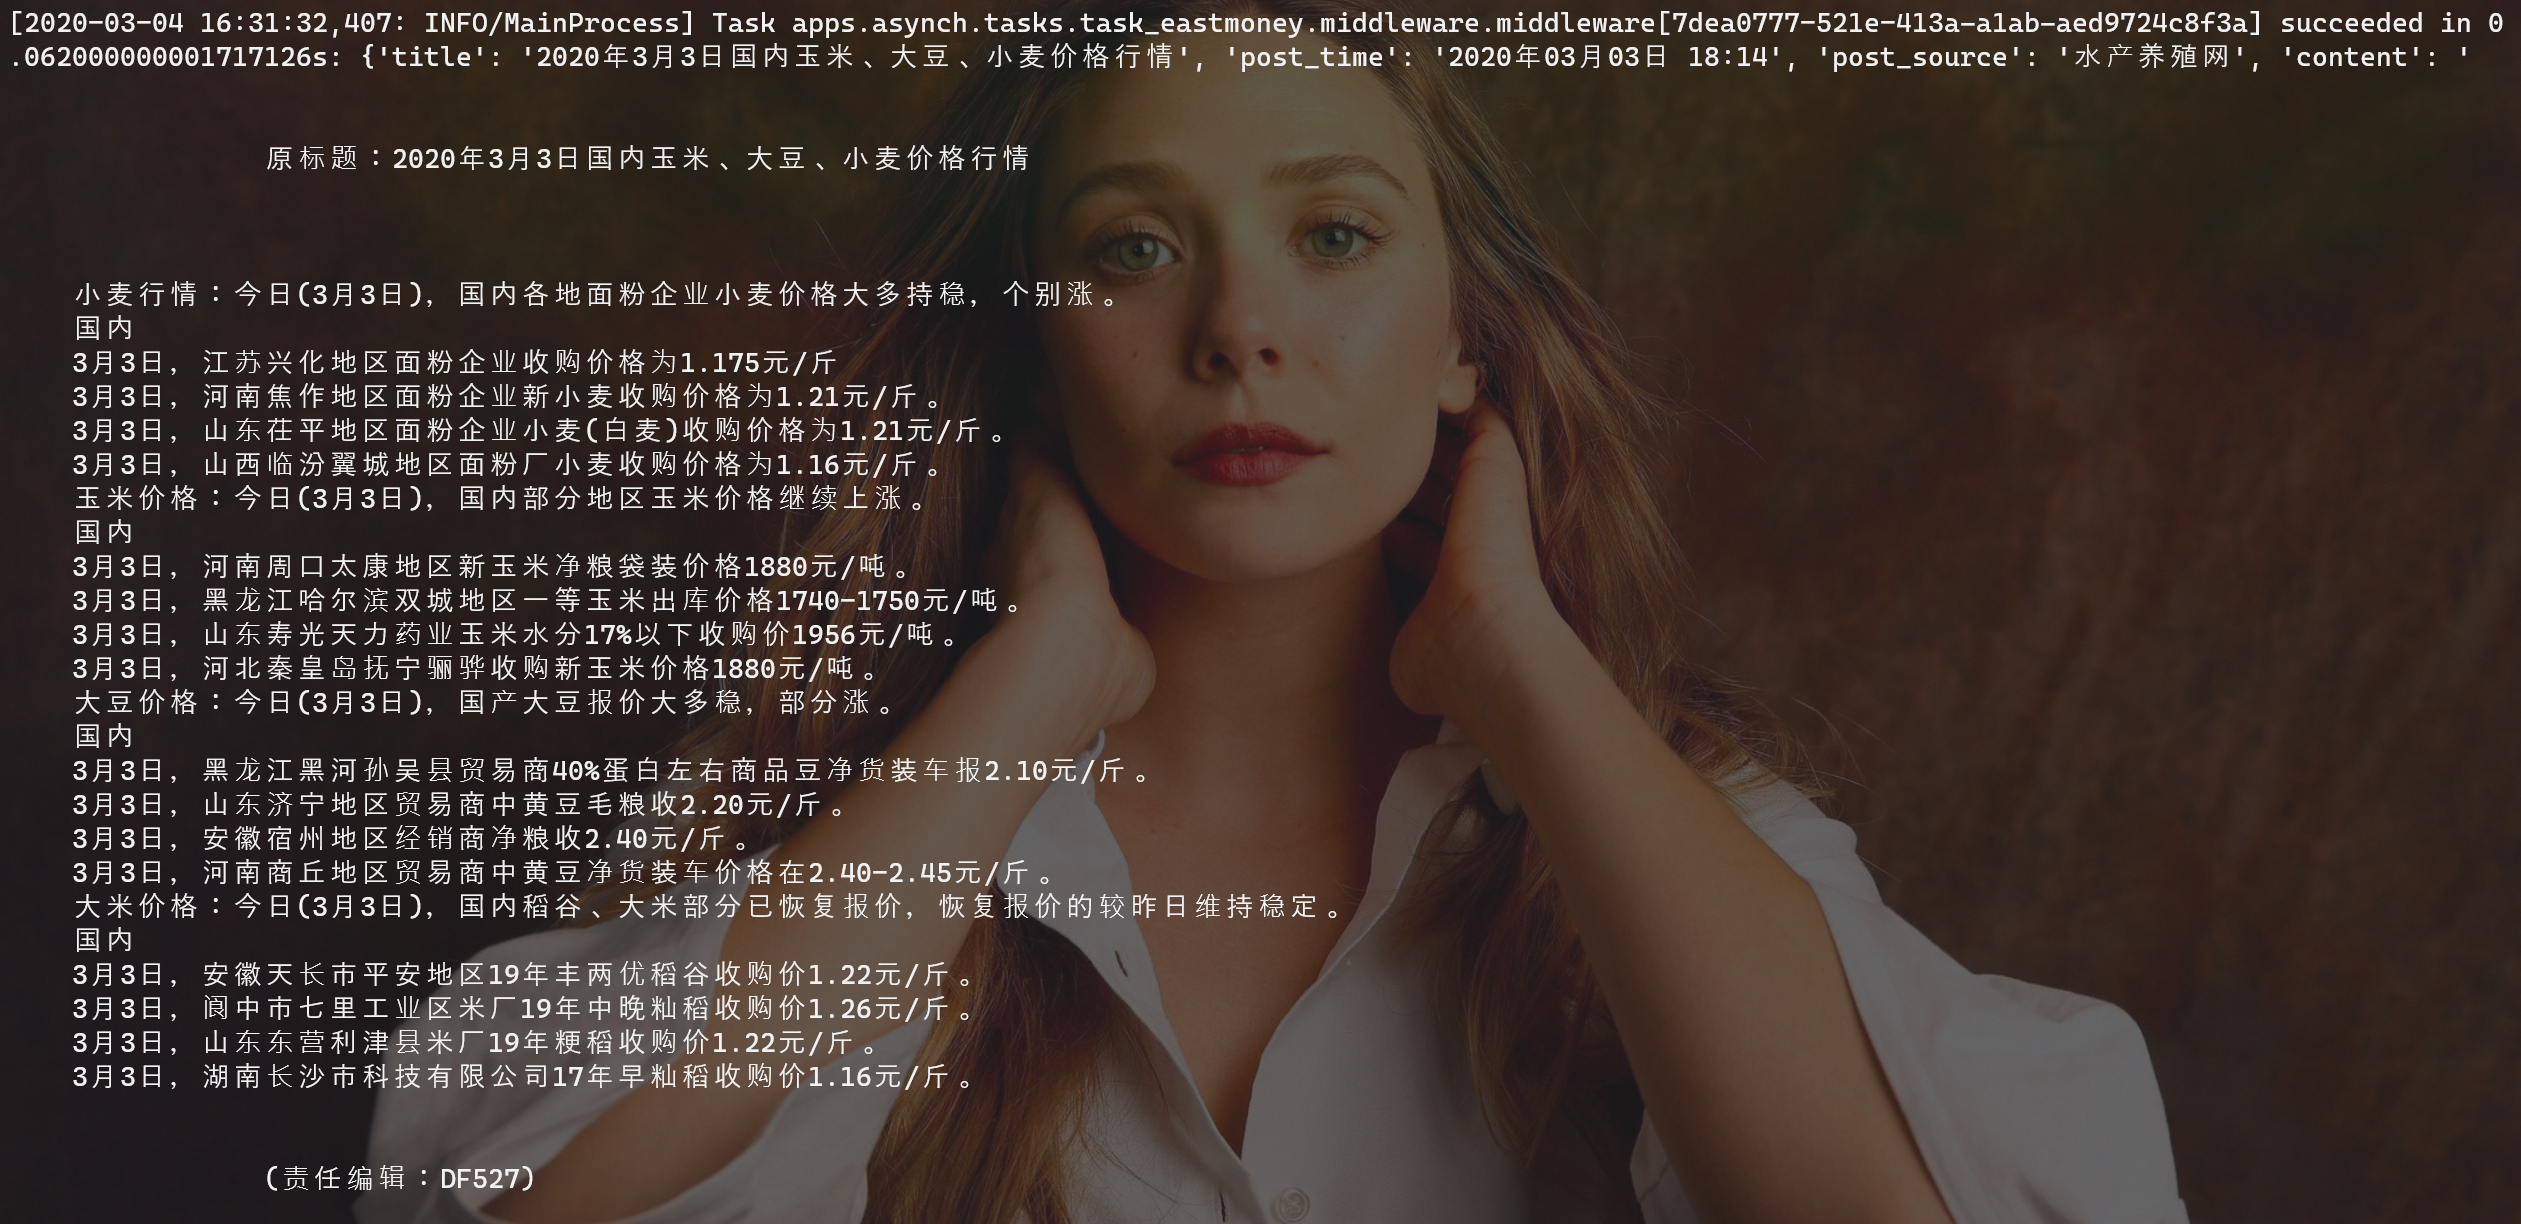
提取信息存储

### 👤 作者介绍:
Ryuchen ( 陈 浩 )
* Github: [https://github.com/Ryuchen](https://github.com/Ryuchen)
* Email: [chenhaom1993@hotmail.com](chenhaom1993@hotmail.com)
* QQ: 455480366
* 微信: Chen_laws
Nameplace ( 虚位以待 )
### 🤝 贡献源码:
Contributions, issues and feature requests are welcome!
Feel free to check [issues page](https://github.com/Ryuchen/DeadPool/tree/master/common/plugins).
### ⭐ 渴望支持:
如果你想继续观察 Deadpool 接下来的走向,请给我们一个 ⭐ 这是对于我们最大的鼓励。
此外,如果你觉得 Deadpool 对你有帮助,你可以赞助我们一杯咖啡,鼓励我们继续开发维护下去。
| **微信** | **支付宝** |
| ------------------------------- | ----------------------------------- |
|
|
|
### 📝 开源协议:
Copyright © 2019 [Ryuchen](https://github.com/Ryuchen).
This project is [GPL](http://www.gnu.org/licenses/gpl-3.0.html) licensed.
请谨遵开源协议,谢谢使用!
***
[](https://github.com/Ryuchen/DeadPool/releases) [](https://github.com/Ryuchen/DeadPool/graphs/contributors) [](https://github.com/Ryuchen/DeadPool/commits/master)