![]()
Present Tensor in Space
English | 中文
![]()
![]()
![]()
![]()
![]()

![]()
图1 - 使用 TensorSpace 创建的交互式 LeNet 模型
## 目录 * [TensorSpace 使用场景](#motivation) * [开始使用](#getting-start) * [使用样例](#example) * [文档](#documentation) * [更新日志](#changelog) * [开发人员](#contributors) * [联系方式](#contact) * [许可证](#license) ##
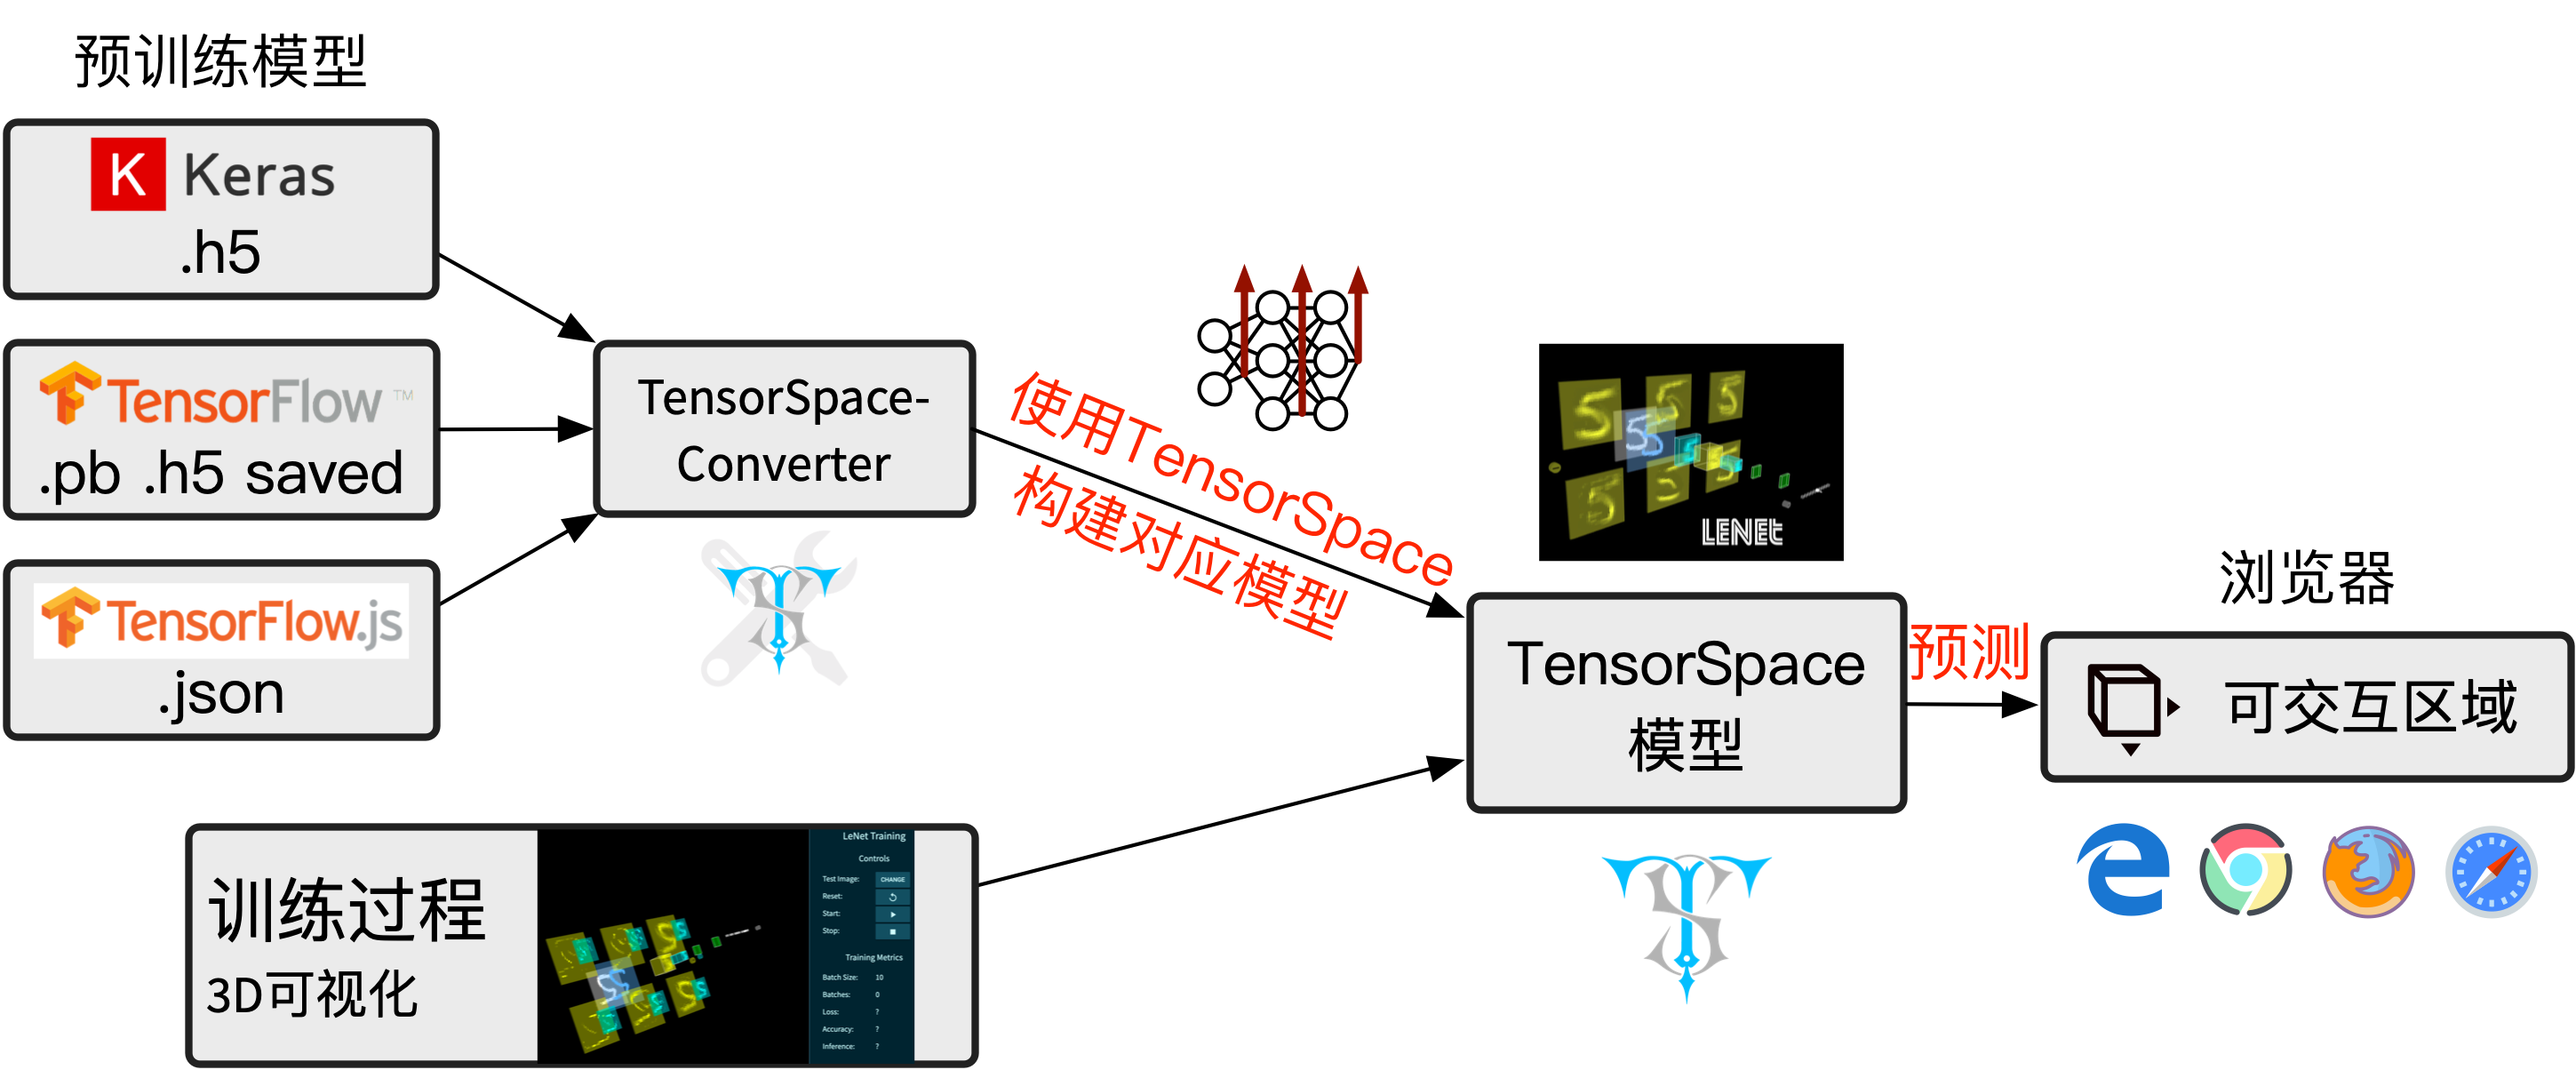
图2 - TensorSpace 使用流程
### 安装 * **第一步: 下载 TensorSpace.js** 我们提供了三种下载 TensorSpace.js 的方法,它们分别是 npm、yarn 以及 来自官方网站。 途径 1: NPM ```bash npm install tensorspace ``` 途径 2: Yarn ```bash yarn add tensorspace ``` 途径 3: [官方网站下载](https://tensorspace.org/index_zh.html#download) * **第二步: 安装依赖库** 请在使用 TensorSapce.js 之前,引入[TensorFlow.js](https://github.com/tensorflow/tfjs)、 [Three.js](https://github.com/mrdoob/three.js)、 [Tween.js](https://github.com/tweenjs/tween.js) 和 [TrackballControl.js](https://github.com/mrdoob/three.js/blob/master/examples/js/controls/TrackballControls.js) 至所需要的 html 文件中,并置于 TensorSpace.js 的引用之前。 ```html ``` * **第三步: 安装 TensorSpace.js** 将 TensorSpace.js 引入 html 文件中: ```html ``` ### 模型预处理 为了获得神经网络中间层的运算结果,我们需要对已有的模型进行[模型预处理](https://github.com/tensorspace-team/tensorspace/tree/master/docs/preprocess_zh)。 基于不同的机器学习库,我们提供了 [TensorFlow 模型预处理教程](https://github.com/tensorspace-team/tensorspace/tree/master/docs/preprocess_zh/TensorFlow)、[Keras 模型预处理教程](https://github.com/tensorspace-team/tensorspace/tree/master/docs/preprocess_zh/Keras) 以及 [TensorFlow.js 模型预处理教程](https://github.com/tensorspace-team/tensorspace/tree/master/docs/preprocess_zh/TensorFlowJS)。 ### 使用 在成功安装完成 TensorSpace 并完成神经网络模型预处理之后,我们可以来创建一个3D TensorSpace 模型。 为了简化步骤,请随意使用我们在 [HelloWorld](https://github.com/tensorspace-team/tensorspace/tree/master/examples/helloworld) 路径下所提供的资源。 我们将会用到[适配 TensorSpace 的预处理模型](https://github.com/tensorspace-team/tensorspace/blob/master/examples/helloworld/model) 以及[样例输入数据(“5”)](https://github.com/tensorspace-team/tensorspace/blob/master/examples/helloworld/data/5.json)作为使用样例来进行说明。所有的源码都可以在 [helloworld.html](https://github.com/tensorspace-team/tensorspace/blob/master/examples/helloworld/helloworld.html) 文件中找到。 首先,我们需要新建一个 TensorSpace 模型实例: ```JavaScript let container = document.getElementById( "container" ); let model = new TSP.models.Sequential( container ); ``` 然后,基于 LeNet 网络的结构:输入层 + 2 X (Conv2D层 & Maxpooling层) + 3 X (Dense层),我们可以搭建其模型结构: ```JavaScript model.add( new TSP.layers.GreyscaleInput({ shape: [28, 28, 1] }) ); model.add( new TSP.layers.Padding2d({ padding: [2, 2] }) ); model.add( new TSP.layers.Conv2d({ kernelSize: 5, filters: 6, strides: 1 }) ); model.add( new TSP.layers.Pooling2d({ poolSize: [2, 2], strides: [2, 2] }) ); model.add( new TSP.layers.Conv2d({ kernelSize: 5, filters: 16, strides: 1 }) ); model.add( new TSP.layers.Pooling2d({ poolSize: [2, 2], strides: [2, 2] }) ); model.add( new TSP.layers.Dense({ units: 120 }) ); model.add( new TSP.layers.Dense({ units: 84 }) ); model.add( new TSP.layers.Output1d({ units: 10, outputs: ["0", "1", "2", "3", "4", "5", "6", "7", "8", "9"] }) ); ``` 最后,我们需要载入[经过预处理的 TensorSpace 适配模型](https://github.com/tensorspace-team/tensorspace/blob/master/examples/helloworld/model/mnist.json)并使用`init()`方法来创建模型对象: ```JavaScript model.load({ type: "tfjs", url: './lenetModel/mnist.json' }); model.init(function(){ console.log("Hello World from TensorSpace!"); }); ``` 我们可以在浏览器中看到以下模型:
![]()
图3 - 所创建的 LeNet 模型 (无输入数据)
我们可以使用我们已经提取好的[手写“5”](https://github.com/tensorspace-team/tensorspace/blob/master/examples/helloworld/data/5.json)作为模型的输入: ``` model.init(function() { model.predict( image_5 ); }); ``` 我们在这里将预测方法放入`init()`的回调函数中以确保预测在初始化完成之后进行([在线演示](https://tensorspace.org/html/helloworld.html))。 点击后面这个CodePen logo来在CodePen中试一下这个例子吧 ~
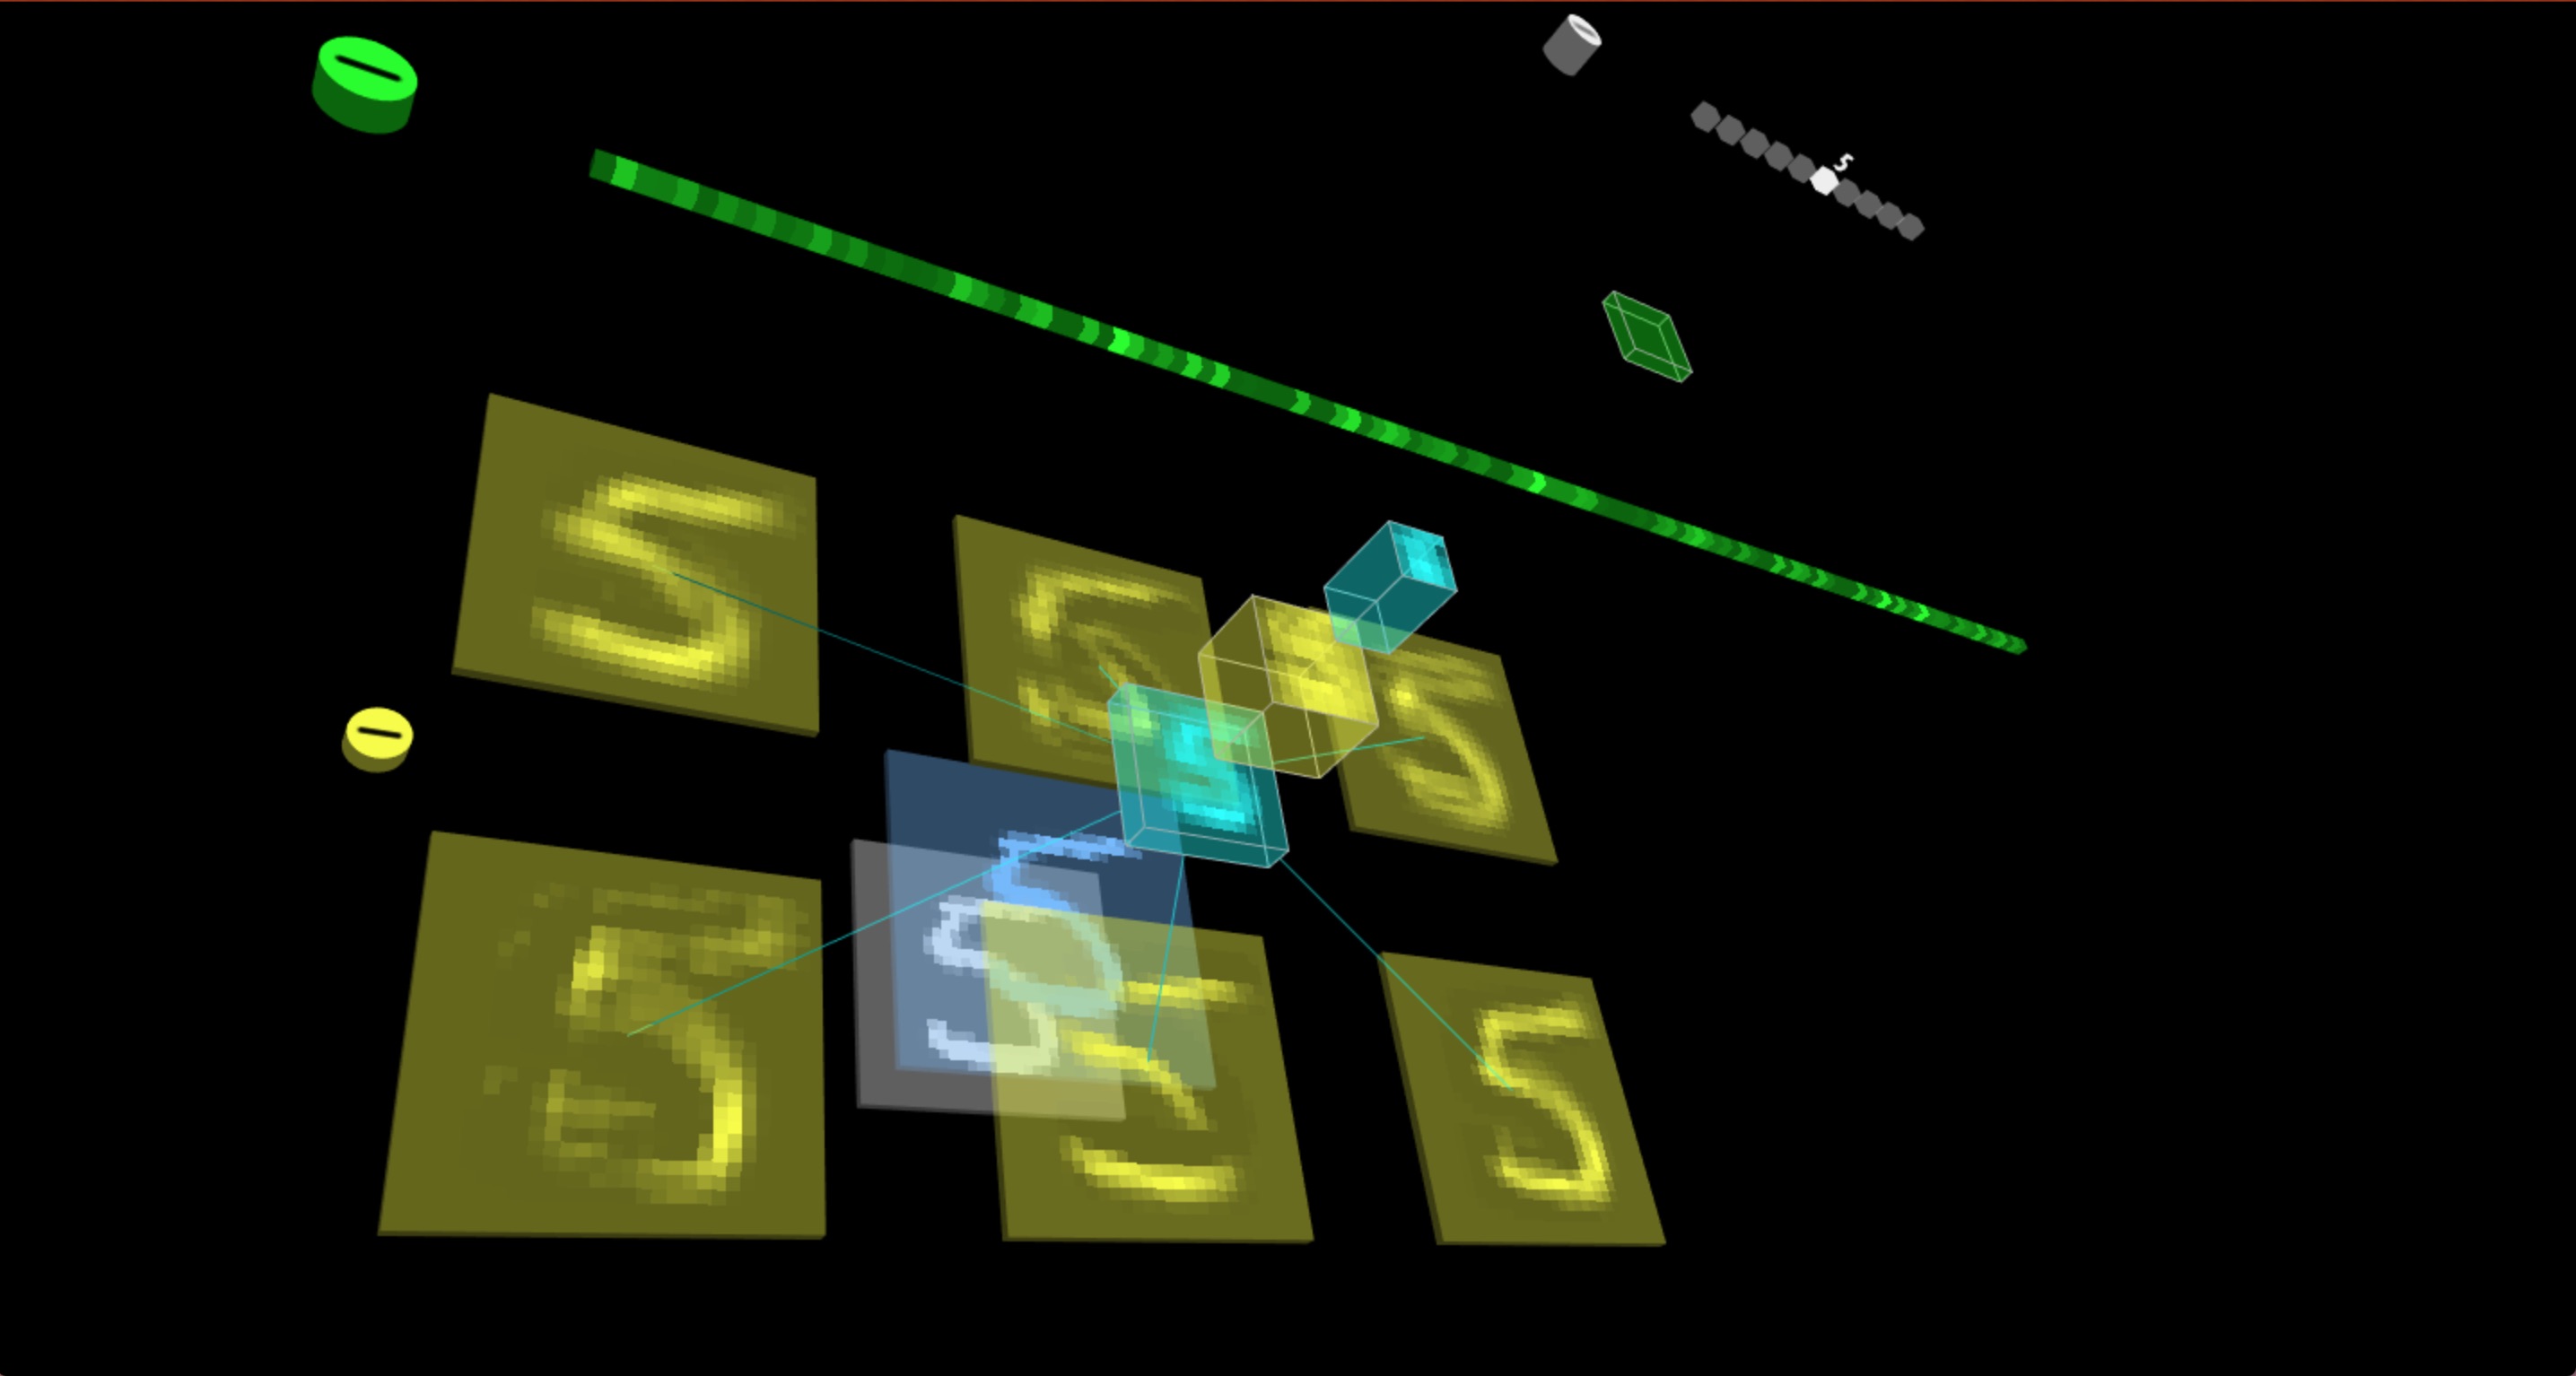
图4 - LeNet 模型判别输入 “5”
##
图5 - 使用 TensorSpace 构建 LeNet
* **AlexNet** [ TensorFlow 模型 ] [➡ 在线演示](https://tensorspace.org/html/playground/alexnet_zh.html)
图6 - 使用 TensorSpace 构建 AlexNet
* **Yolov2-tiny** [ TensorFlow 模型 ] [➡ 在线演示](https://tensorspace.org/html/playground/yolov2-tiny_zh.html)
图7 - 使用 TensorSpace 构建 YOLO-v2-tiny
* **ResNet-50** [ Keras 模型 ] [➡ 在线演示](https://tensorspace.org/html/playground/resnet50_zh.html)

图8 - 使用 TensorSpace 构建 ResNet-50
* **Vgg16** [ Keras 模型 ] [➡ 在线演示](https://tensorspace.org/html/playground/vgg16_zh.html)
图9 - 使用 TensorSpace 构建 VGG-16
* **ACGAN** [ Keras 模型 ] [➡ 在线演示](https://tensorspace.org/html/playground/acgan_zh.html)
图10 - 使用 TensorSpace 构建 ACGAN 生成网络
* **MobileNetv1** [ Keras 模型 ] [➡ 在线演示](https://tensorspace.org/html/playground/mobilenetv1_zh.html)

图11 - 使用 TensorSpace 构建 MobileNetv1
* **Inceptionv3** [ Keras 模型 ] [➡ 在线演示](https://tensorspace.org/html/playground/inceptionv3_zh.html)
图12 - 使用 TensorSpace 构建 Inceptionv3
* **LeNet训练过程3D可视化** [ TensorFlow.js 动态模型 ] 使用 TensorSpace.js 和 TensorFlow.js 将 LeNet 的训练过程在浏览器端进行3D可视化展示 [➡ 在线演示](https://tensorspace.org/html/playground/trainingLeNet_zh.html)
图13 - LeNet训练过程3D可视化
### 本地查看以上模型 有些模型非常大,使用官网的`Playground`载入非常慢。如果你想获得更好的载入速度,把`TensorSpace`项目拷贝到本地是一个好选择 - 第一步:`Clone` 项目文件夹到任意文件夹(无系统要求,这一步时间较长,大约2GB大小,都是预训练模型) ```bash git clone https://github.com/tensorspace-team/tensorspace.git ``` - 第二步: 在TensorSpace的根目录下,编译最新的TensorSpace.js ```bash cd tensorspace npm run build ``` - 第三步:本地使用 `WebStorm` 打开项目 - 第四步:打开 `/examples` 文件夹,点选任意模型的 `.html` 文件(比如`/exampes/resnet50/resnet50.html`) - 第五步:点击**右上角**的Chrome图表在本地运行`.html` 文件(`js` 和 `css` )直接可以在本地浏览器内查看对应模型 ##


